The VM Blog: Windows 3.1
- Ray Chen
- Apr 9, 2017
- 2 min read
Windows 3.1 is classic. All those hours learning to double click, set up wifi, and add "win" to your autoexec were somehow remembered as the "Happy Times". Don't you want to relive them?
STEP 1
Installing VirtualBox (Copy/Pasted from Ubuntu Guide)
Note: If you have already done this, you can skip this part.
First, get the VirtualBox install file that is right for you. You can find it on
my downloads page. Then, run the file and follow the instructions. It is
highly recommended that you disable the networking and USB features, but
they could be useful later on for some VMs. After the installation is finished,
you should see a screen with a cartoon of a Windows butterfly and Tux (The
Linux penguin) on the right side. Good? Alright, next step.
STEP 2
DOWNLOAD
Download Windows 3.11, along with MS-DOS 6.22 and the drivers on the downloads page. It comes in .zip files, which can be opened with File Explorer in Windows, or WinZip on Linux or Mac OS.
STEP 3
New Virtual Machine
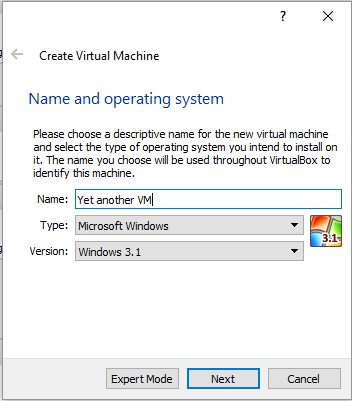
Select 'New' at the VirtualBox home screen. Then, name your VM and select "Windows" in the first box and then "Windows 3.1" in the second. Give it 64 MB of memory

and anything between 1.0 and 2.0 GB of disk space. Then, confirm your changes and start the VM.
STEP 4
Installing MS-DOS
For Windows to work, we first need MS-DOS 6.22. Go to Settings>Storage and select the floppy drive. Insert the first MS-DOS disk and start the VM. Follow the recommended instructions, and you should be prompted to insert disk 2 and 3 at times. Do that normally by going to Devices>Floppy Drives>Choose Disk Image... and selecting either disk 2 or 3 based on the prompt. Your install should now be finished.
STEP 5
Installing Windows
Now, let's install Windows itself. Insert the first windows disk and type A:\ at the prompt. After that, type install and select the recommended options. Insert the prompted disk when asked to do so, and soon Windows will reboot into something more, well, Windows-like. Enter your name, company, and product code if you have one. Windows will continue installing. When prompted,

select that you have no networks or printers, as you will configure those later. Skip the tutorial, as you probably already know how to use the mouse and it is generally a big time waster.
STEP 6
Drivers
First, insert the cdrom floppy disk. Type "A:\" and then "install" and go with the recommended options. After that, insert the dosidle floppy disk and do the same there. Now, reboot and insert the SB16Win3x .iso in the optical drives section. Now, type "D:\" at the prompt and "install".
Comments